플루터 환경설정
1. 플루터 다운로드
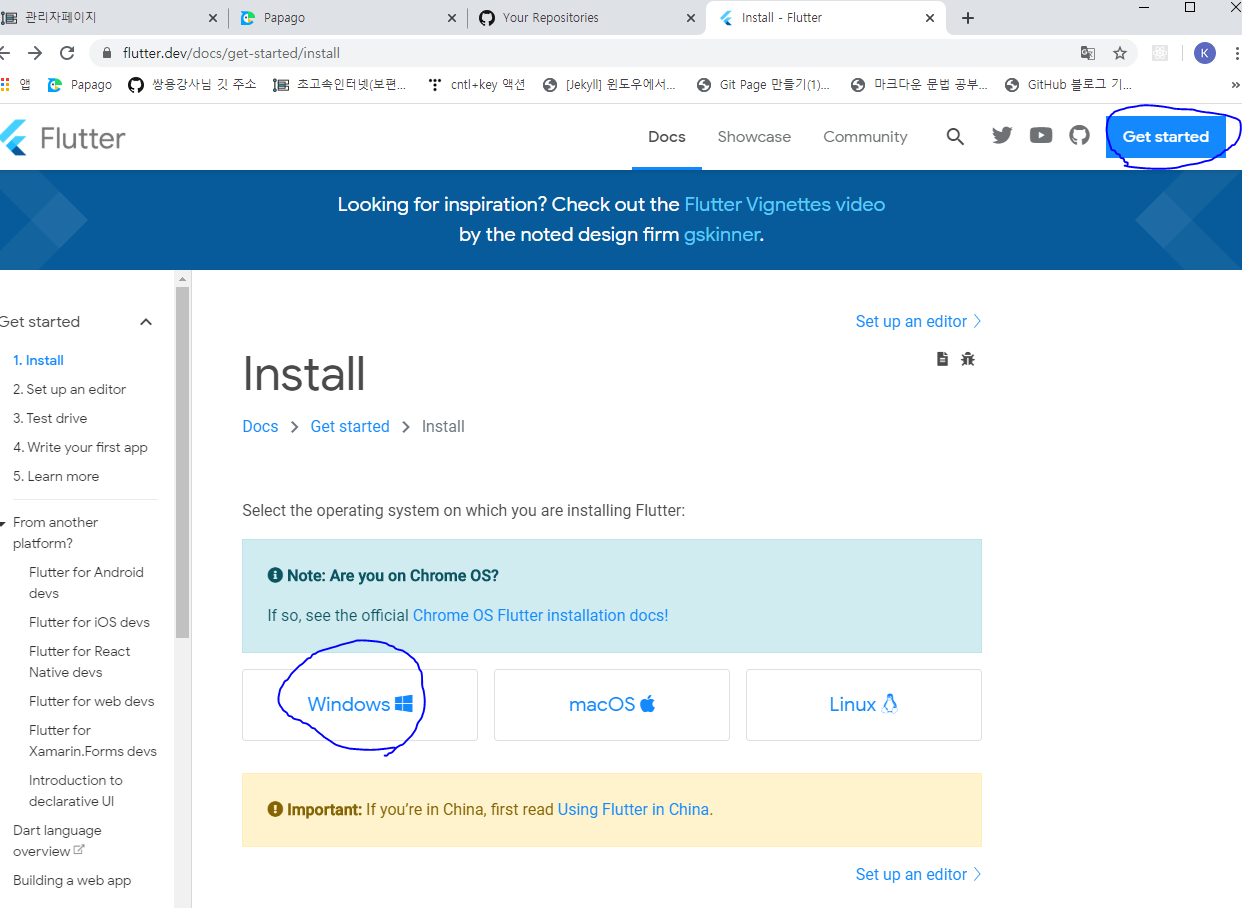
- (https://flutter.io) url 접속
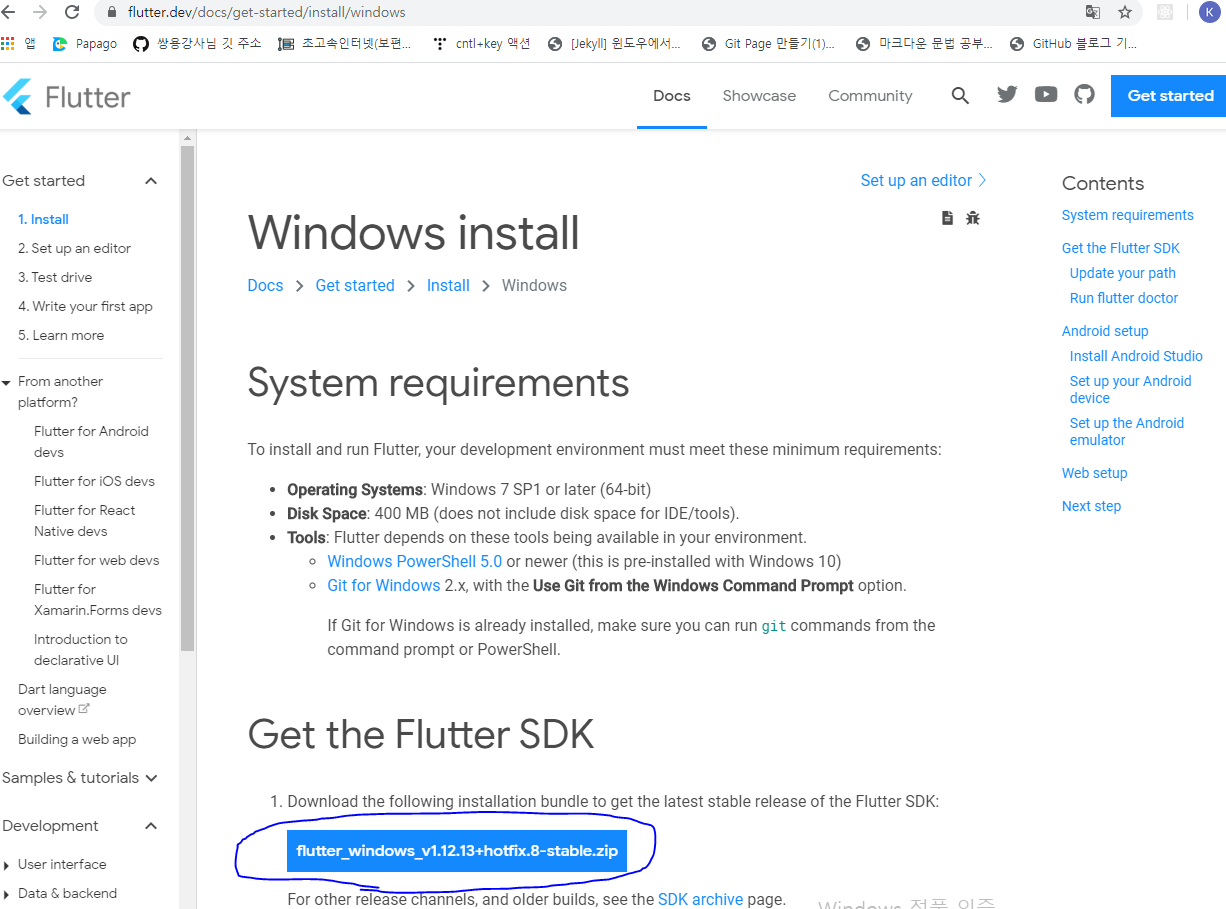
- 아래와 같이 설치
2. 압축 풀고 환경변수 세팅
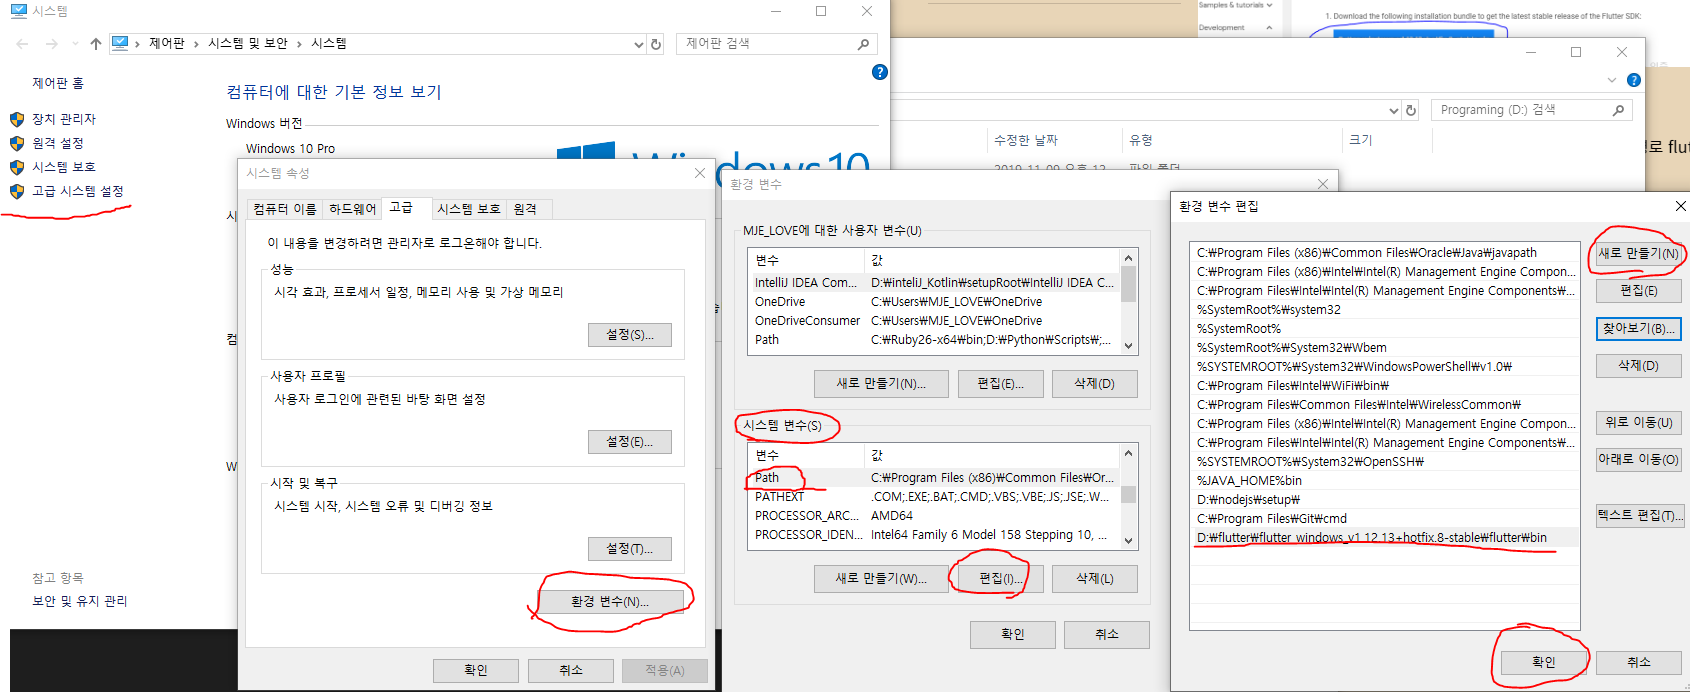
- flutter_windows_v1.12.13+hotfix.8-stable\flutter\bin 경로 flutter 파일을 환경변수 세팅
- 내컴퓨터 -> 속성 -> 고급시스템 설정 -> 환경변수 -> path설정 -> 새로만들기 -> flutter/bin 폴더 경로를 넣어준다.
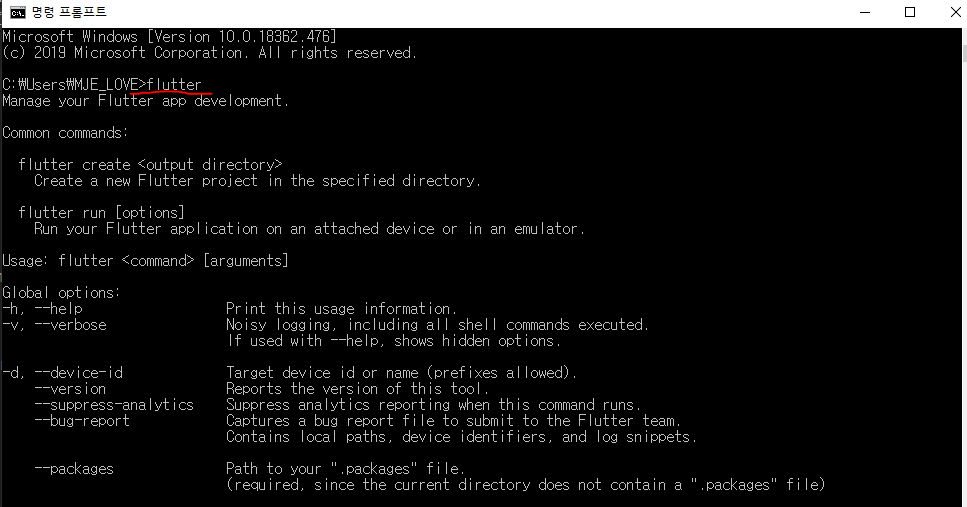
- 시작 -> cmd 창에 라고 치면 아래와 같이 나오면 설정이 되었다는 것?!!!!
flutter
3. 안드로이드 설치 & 플루터 플러그인 추가
- 안드로이드는 각 상황에 따라 최신버전 추천…
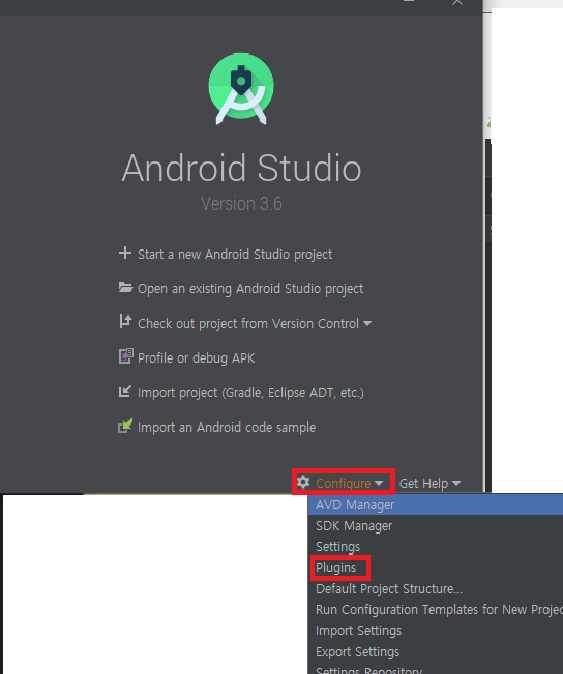
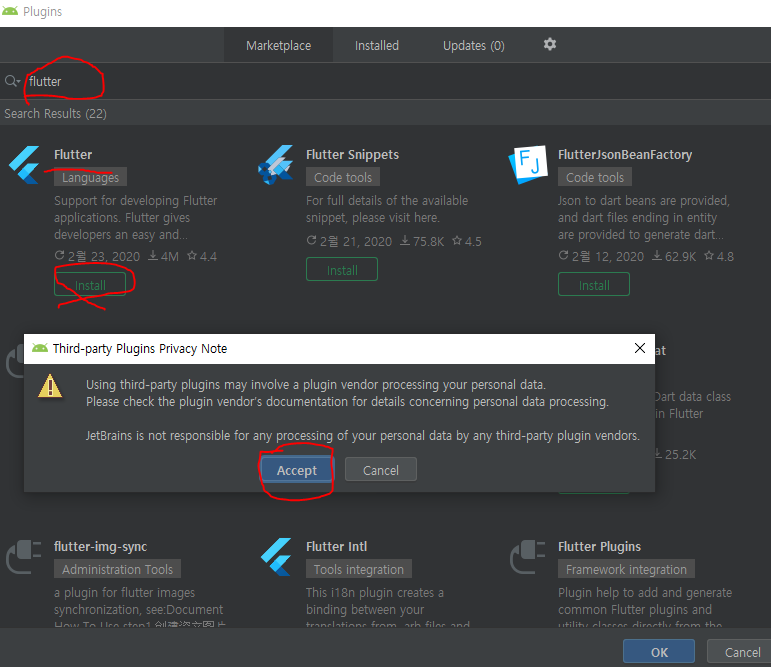
- 안드로이드 실행 초기화면 -> configure -> plugin 추가
- 시작 -> cmd 창에 flutter doctor라고 치면 플루터 환경이 제대로 이루어 졌는지 확인할수 있음
flutter docto
- 근데 저 빨간 느낌표는 라이센스 동의를 해야한다고 한다..?
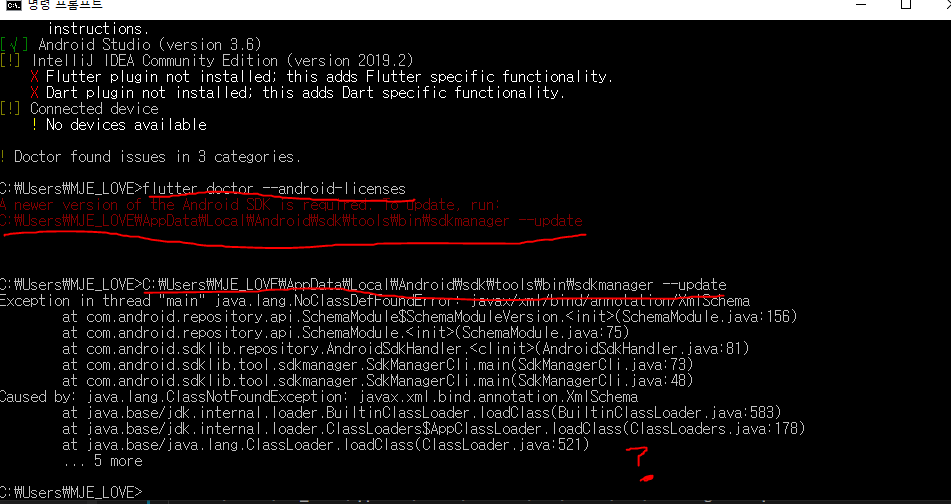
- 저문제를 해결하기 위해 다시 명령어에 flutter doctor –android-licenses 쳐준다…
flutter doctor --android-licenses
돌발 Err상황
- A newer version of the Android SDK is required. To update, run 라고 또 에러가뜬다.?
- C:\Users\MJE_LOVE\AppData\Local\Android\sdk\tools\bin\sdkmanager –update 으로 명령어 쳐준다.
- 앵? 에러다..1
- 찾아보니 java9 이상을 쓰고 있다면 위와 같이 에러가 뜨는 걸로 나와있다…
- 이유는 java.se 모듈에 포함되지 않아서..
- java9부터는 모듈 개념이 등장, java.se모듈이 classpath에서 사용가능…
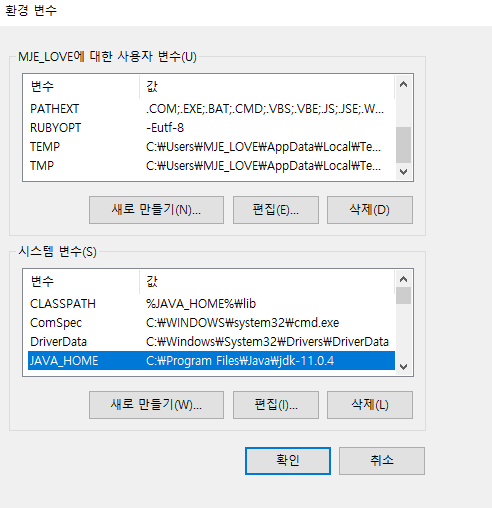
- 그래서 내 자바는 몇버전인지 환경변수 확인…
- 그래도 난 java11 버전을 그대로 사용하고 싶기에 그냥 환경변수 통해 모듈을 더해주는 방법 선택!
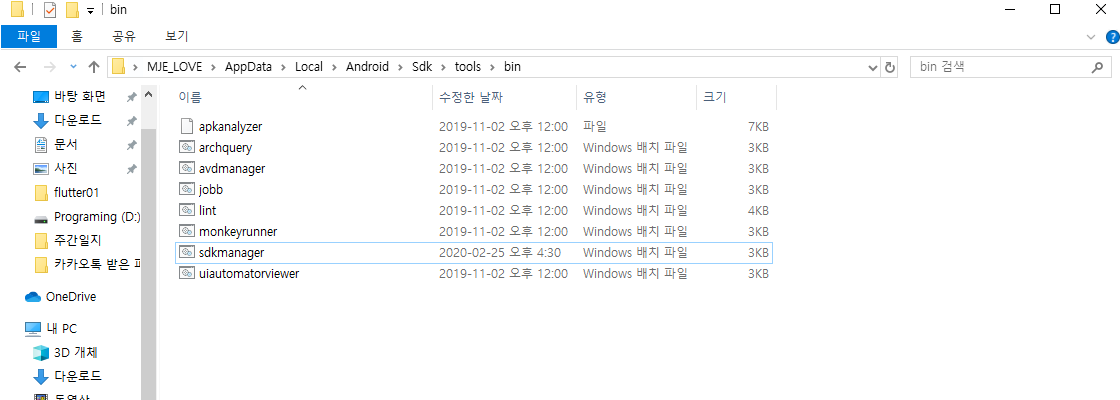
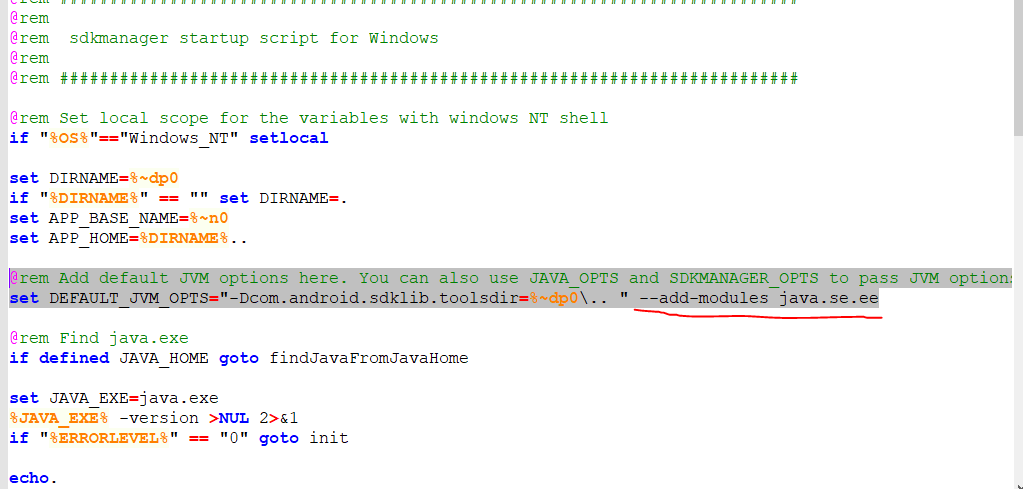
- 문제의 그 sdkmanager 경로로 가서 메모장이나 노트패드로 열어준다음 아래 명령어 뒤에 추가
--add-modules java.se.ee
- 또 에러…2
Error occurred during initialization of boot layer
java.lang.module.FindException: Module java.se.ee not found
- 이유 : JDK 11 이 되면서 Java EE와 CORBA Module이 제거다고 한다…
-
그냥 8버젼으로 다운시키고 사용하라고 한다…
- 8버전으로 바꾸고 다시 명령어 실행… 실행이 되질 않는다.
- 명령어가 잘못된건지 뭔지도 모르겠고 다 찾아봐도 이설명이 전혀 나오지 않는다…
C:\Users\MJE_LOVE>C:\Users\MJE_LOVE\AppData\Local\Android\sdk\tools\bin\sdkmanager --update
Usage:
  sdkmanager [--uninstall] [<common args>] [--package_file=<file>] [<packages>...]
  sdkmanager --update [<common args>]
  sdkmanager --list [<common args>]
  sdkmanager --licenses [<common args>]
  sdkmanager --version

With --install (optional), installs or updates packages.
    By default, the listed packages are installed or (if already installed)
    updated to the latest version.
With --uninstall, uninstall the listed packages.

    <package> is a sdk-style path (e.g. "build-tools;23.0.0" or
             "platforms;android-23").
    <package-file> is a text file where each line is a sdk-style path
                   of a package to install or uninstall.
    Multiple --package_file arguments may be specified in combination
    with explicit paths.

With --update, all installed packages are updated to the latest version.

With --list, all installed and available packages are printed out.

With --licenses, show and offer the option to accept licenses for all
     available packages that have not already been accepted.

With --version, prints the current version of sdkmanager.

Common Arguments:
    --sdk_root=<sdkRootPath>: Use the specified SDK root instead of the SDK
                              containing this tool

    --channel=<channelId>: Include packages in channels up to <channelId>.
                           Common channels are:
                           0 (Stable), 1 (Beta), 2 (Dev), and 3 (Canary).

    --include_obsolete: With --list, show obsolete packages in the
                        package listing. With --update, update obsolete
                        packages as well as non-obsolete.

    --no_https: Force all connections to use http rather than https.

    --proxy=<http | socks>: Connect via a proxy of the given type.

    --proxy_host=<IP or DNS address>: IP or DNS address of the proxy to use.

    --proxy_port=<port #>: Proxy port to connect to.

    --verbose: Enable verbose output.
    * If the env var REPO_OS_OVERRIDE is set to "windows",
  "macosx", or "linux", packages will be downloaded for that OS.
- 뭐가 문제인지도 모르겠다 자바 8버전까지도 바꾸었는데 안드로이드 sdkmanager가 인식이 안되는걸까?
-
일단 안드로이드 수동으로 업데이트를 해보았다…
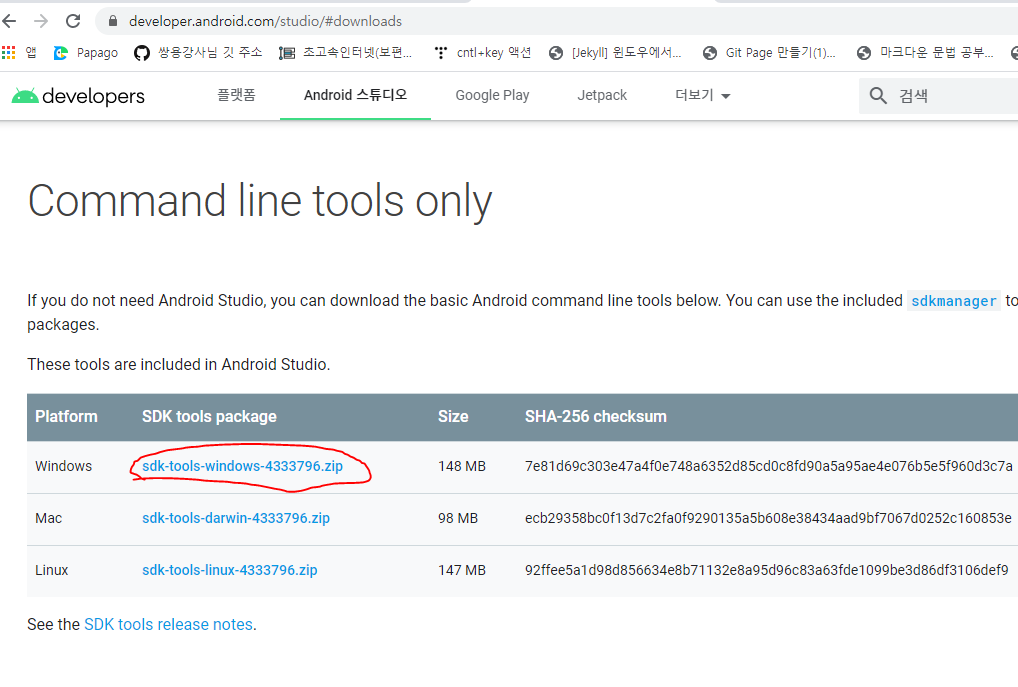
- https://developer.android.com/studio/#downloads에서 sdk 수동으로 다운로드
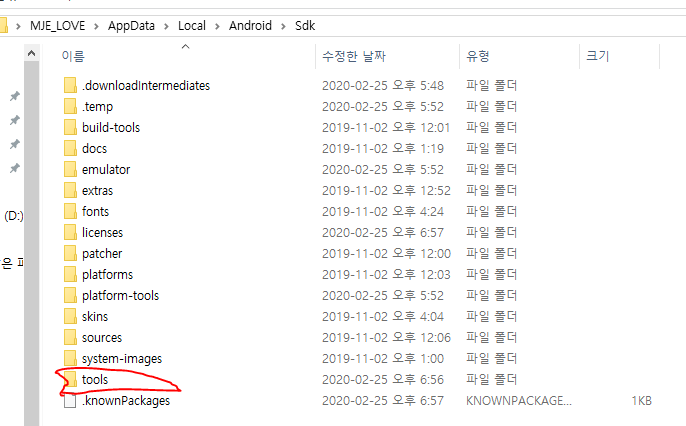
- 압축을 풀고 원래 있던 sdk 폴더 경로로 가서 tools 폴더에 덮어 씌웠더니 해결~!~!~!
- 와!!!!!!!!!!!!
- 마지막으로 다시 라이센스 동의 flutter doctor –android-licenses 명령어 쳐주고 Y,Y,Y를 3번 쳐주면 완벽하게 설정을 다 잡은것이다!
flutter doctor --android-licenses
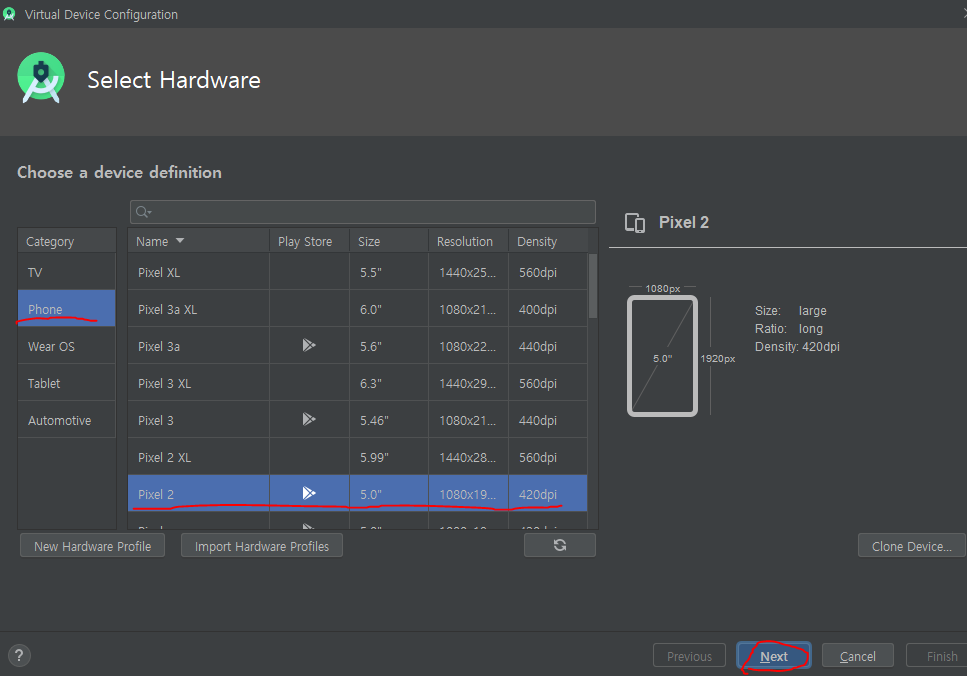
4. 안드로이드 실행
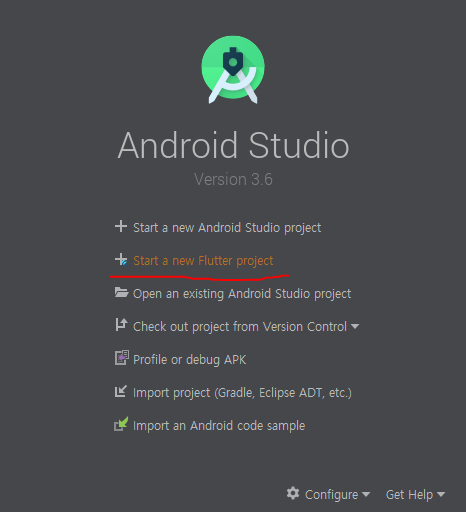
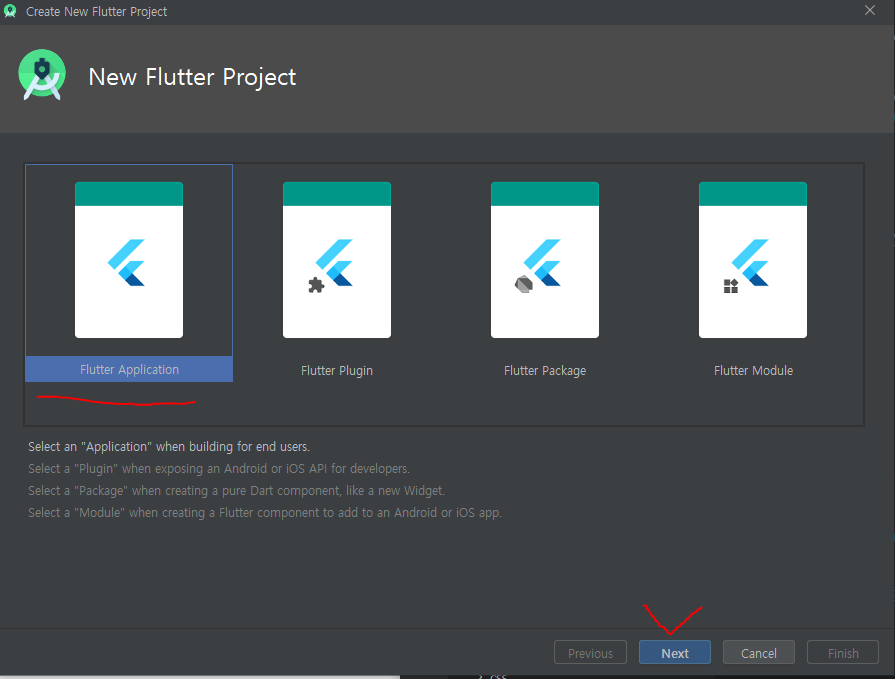
- 프로젝트 생성
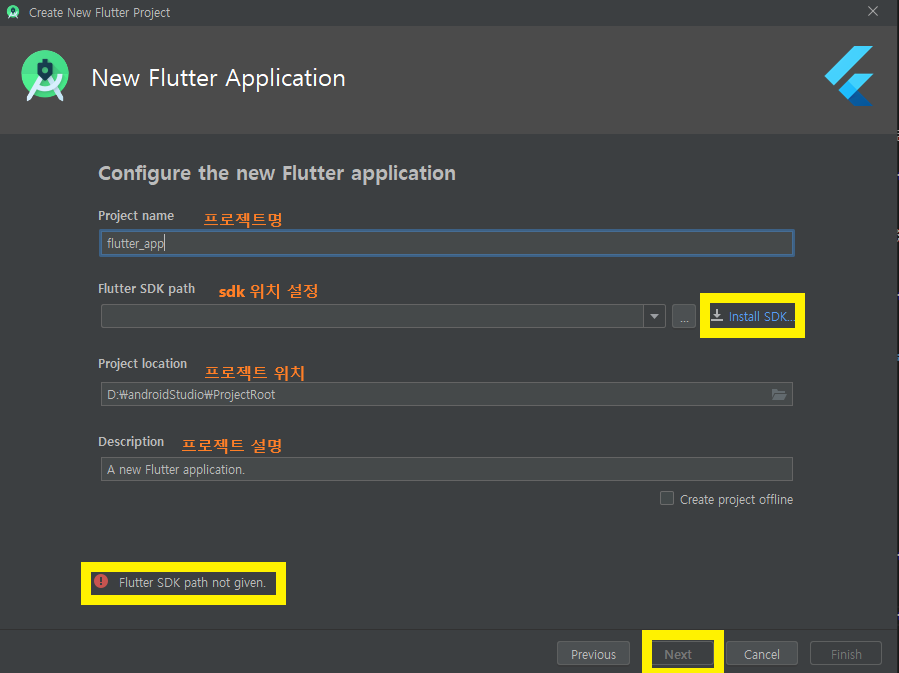
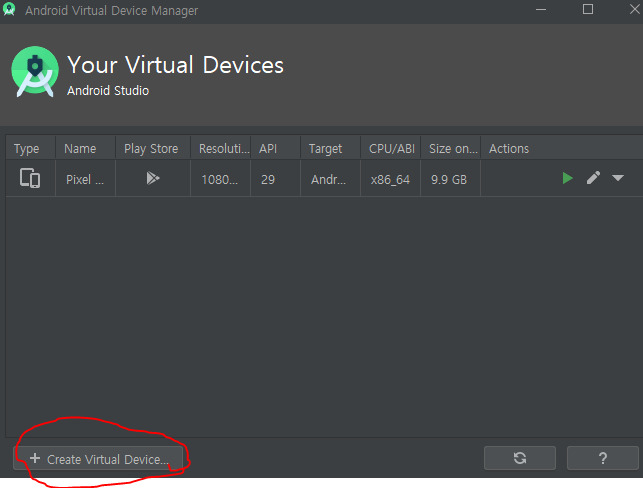
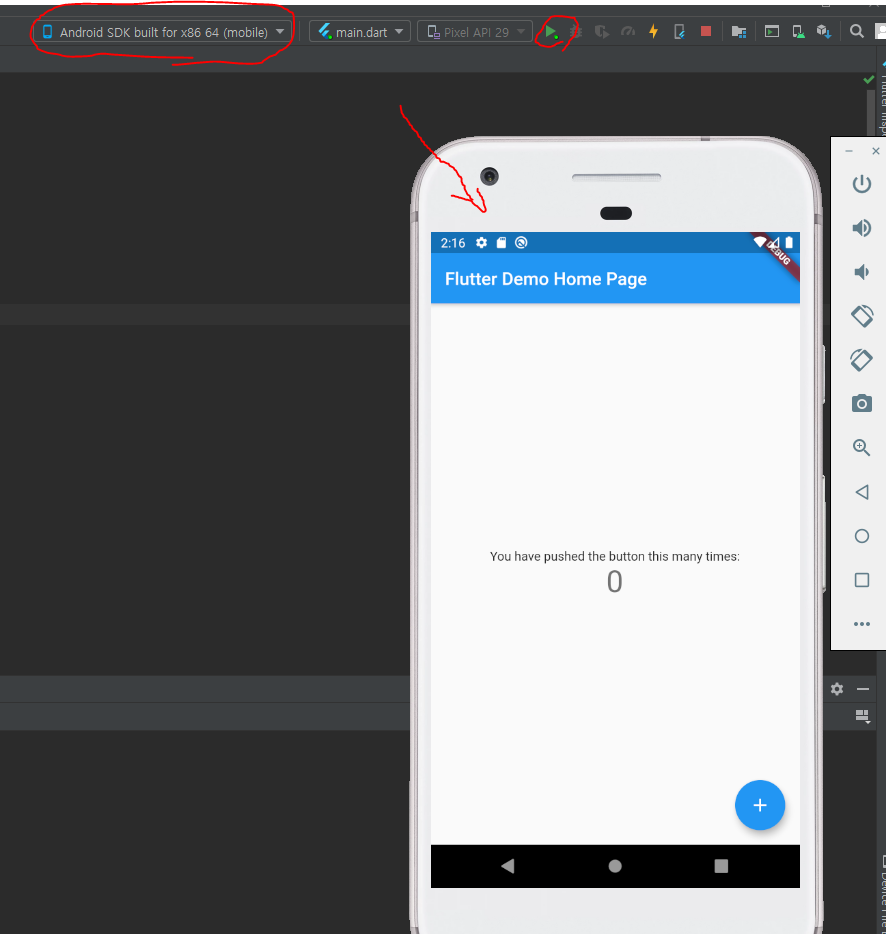
- 다 설정했으면 실행시키자!
- 아래와 같이 나오면 준비 끝!! 이제 부터 본격적으로 즐코해볼까요?!!




댓글남기기